Nvidia Tegra ADB driver installation

Since a couple of people ask me about installing the ADB stuff, … here we go.. 🙂

So these is how i managed to get it working.

  1. Remove your POV drivers, these drivers are for rescue stuff.
  2. Install the Latest Android SDK
  3. Open the SDK Manager in “Admin” Mode and download and under “Available Packages” -> “Third party Add-ons” download the “Google USB Driver package.  After installation you will find the ADB driver under “..Android\android-sdk\extras\google\usb_driver”
  4. Goto “..Android\android-sdk\extras\google\usb_driver” and open android_winusb.inf.
    1. Search for [Google.NTx86] and [Google.NTamd64] add

;NVIDIA Tegra

%SingleAdbInterface% = USB_Install, USB\VID_0955&PID_7000

%CompositeAdbInterface% = USB_Install, USB\VID_0955&PID_7100&MI_01 (well spotted Michael 🙂 )

  • Open a shell an execute “echo 0x955>> %USERPROFILE%\.android\adb_usb.ini” (now without post space after hex, well spottet susafi!)
  • Connect your POV to your PC. Open the device manager. Here you should see something like “Nvidia Harmony with a yellow sign.
  • Right-click it and click ‘Update Driver Software..’. -> select to pick from a list device drivers on your computer
  • Browse to the google-usb_driver folder inside your Android SDK folder and select the android_winusb.inf file
  • Now you should see a new section “Android Phone” -> “Android Composite ADB Inteface”
  • Stop – Start you ADB server and check with “adb devices” for your POV. You should see something like

List of devices attached
0270308343a11617        device

One last note, if you have troubles deinstalling your POV driver, you can use “USBDeview”. Just search google for it.

have fun
POV Mobii Tegra Tablet and how to pimp it

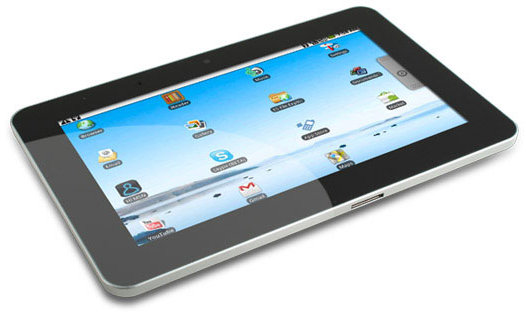
A few days ago I got a shiny new Point of View Mobii Tegra 2 drive tablet.

The POV Mobii is equipped with :

  • Dual core Cortex A9 – 1 GHz
  • NVIDIA Tegra 250
  • Memory 512 MB DDR2 + 512 MB NAND
  • LCD display 10.1″ 1024×600 Capacitive touch screen
  • Operating system Android 2.2
  • WiFi 802.11 b/g
  • Graphics output HDMI
  • Audio ports Headphone out
  • Speakers 2x 1 W
  • Webcam 1.3M Pixel
  • USB Ports 1x USB 2.0 host

– So far so good.

But…, there is no android market installed, … for now 🙂 and the USB host mode is set to master.

So what can you do…..

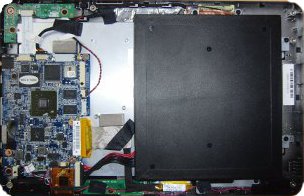
After googling around and with the help of some hardware debugging I found out that the used hardware seems to more or less the reference design for the Tegra hardware which is also used in some other products.

One of this is Products is the Vega ADVENT Tablet. The OS used with this tablet supports USB host slave mode .

The first thing you have to do is to download the image for the Vega and flash you Mobii. (I’m using versoin 1.08).

After bootup you will have a MobiiVega-hybrid :-). You will also notice that the Vega OS is a bit faster then the POV version.

The next step is to upload a special ROM addon called the MoDaCo ROM addon. You can download it from here. If you have problems installing the addon on your 1.08 image you can also download the 1.06.05

Upload the addon is a bit more tricky. In the downloaded addon archive you will find an android debugging  bridge driver ADB . This driver must be installed for your MobiiVega-hybrid.

I used WIN7 for that process and encountered some problems where the tablet with activated USB debugging was not recognized by the OS.

If you also run into this problem you can fix it like doing the following:

Got to your device manager and open the USB-Controller section. There you will find a USB-Composite Device. Remove this device with its drivers and trigger a search for new hardware. Now you will get a new device ADB device for which you can install the ADB drivers.

After extracting the downloaded archive execute the install scripts and … here you go with android market, and a lot of other goodies 🙂

If you interested in some more details you may also have a look here. There are also some modified kernels around read here.

Ahhh and yes…. It goes without saying that any modification you do on your tablet and which eventually may fail are not in my responsibility :-).

have fun

SVN Couldn’t perform atomic initialization fix

After upgrading from debian squeeze I run into the problem that every commit was failing with “Couldn’t perform atomic initialization“.

See Debian bug report

My apache logs are showing :

[error] [client ] Couldn’t perform atomic initialization [500, #200029]

[error] [client ] Couldn’t perform atomic initialization [500, #200029]

[error] [client ] SQLite compiled for 3.7.4, but running with 3.7.3 [500, #200030]

So it looks like that libapache2-svn is build against libsqlite3 3.7.4 which is currently in Sid. In Squezze we have libsqlite3 3.7.3

A quick fix would be to take the libsqlite3 package from Sid for now.

have fun

Last login patch for Trac UserManager plugin

I just have added a visit motivation feature to the Trac Usermanager plugin. With the included patch set you will get an additional column Last Login in the “UserProfilesList” macro.

This patch applies to UserManager plugin rev 5520  🙂

--- macros.py	(revision 300)
+++ macros.py	(revision 301)
@@ -10,6 +10,8 @@
 from trac.wiki.macros import WikiMacroBase
 from trac.wiki.formatter import wiki_to_html
 from trac.web.chrome import Chrome, add_stylesheet, add_script
-from trac.util.datefmt import format_datetime
+from trac.util.datefmt import format_datetime, to_datetime
+from datetime import datetime

 from tracusermanager.api import UserManager, User
 from tracusermanager.profile.api import UserProfileManager, IUserProfilesListMacroCellContributor
@@ -72,9 +73,29 @@
             data['user_profiles'] = UserManager(self.env).search_users(user_profile_templates)
         else:
             data['user_profiles'] = UserManager(self.env).get_active_users()
-
+
+        db = self.env.get_db_cnx()
+        cursor = db.cursor()
+        cursor.execute("SELECT sid,last_visit FROM session WHERE authenticated=1")
+        last_visits={}
+        for username, last_visit in cursor:
+          for user in  data['user_profiles']:
+              date_diff = datetime.now().date()  - datetime.date(to_datetime(last_visit))
+              if date_diff.days > 1:
+                user['last_visit'] = "%d days ago" % date_diff.days
+              elif date_diff.days == 1:
+                  user['last_visit'] = "%d day ago" % date_diff.days
+              else:
+                  user['last_visit'] = "today"
+
+              #user['last_visit'] = format_datetime(last_visit,"%b %d.%m.%Y %H:%M:%S")
+
+
         data['cells']=list(self._get_cells(data['user_profiles']))
-
+
         # add stylesheet&script
         add_stylesheet(formatter.req,'tracusermanager/css/macros_um_profile.css')
         add_script(formatter.req,'tracusermanager/js/macros_um_profile.js')
@@ -102,8 +113,9 @@
         yield ('name', _('Name'),0)
         yield ('email', _('Email'),1)
         yield ('role', _('Role'),2)
+        yield ('last_visit', _('Last login'),3)
     def render_userlistmacro_cell(self, cell_name, user):
-        """Should render user cell"""
+        """Should render user cell"""
         return user[cell_name]

 class TeamRosterMacro(UserProfilesListMacro):

have fun

How to solve Android adb device not found errors

To get your newly build Apps down to your device you have to use the ADB (Android Debug Bridge). The common way to  make your device ready for playing is to download the USB driver package which is included in the SDK Manager.

But these drivers are only for a couple of common mobile devices, so what if you have an ARCHOS 8 like me…. you still getting stuck with a nice…. device not found ….

The first part is easy, Archos in my case, offers his own usb drivers .

After downloading the USB driver I got a shiny “Archos 7 ADB” item under “Android Phone” in my windows device manager. But what the hell,…. after restarting the ADB daemon,…. “ADB devices” was only showing annoying … device not found….   mannnn.

Hmm, google is your best friend :-)…… The solution is that the ADB daemon needs also your USB device vendor ID (VID)

If you cannot get it from your device vendor you may look under device manager -> device details -> hardware ID -> USB\VID_xxxx.

The VID for the adb should be placed in a file under {user home}/.android/adb_usb.ini.

Insert the VID in HEX notation {0x0e79}

If this file does not exist, just create it!

have fun